


When you order an SSL Certificate, it will remain in Pending status until you upload your Certificate Signing Request (CSR).
This guide will show you how to generate and submit your CSR so your SSL Certificate can be issued.
Step 1: Generate Your CSR
Option A: Customers with Control Panel like cPanel, Plesk, etc
Due to cPanel’s popularity among NetShop ISP customers, the following steps and screenshots are for cPanel control panel.
1. Log in to cPanel.
2: Go to the SSL/TLS section.


3. Click Generate, view or delete SSL certificate signing requests from the right-side panel.


4. Enter the required details:
- Common Name – your domain name (e.g., example.com).
- Location & Country – city, state, country.
- Organization Name – your company or personal name.


Then click Generate to submit the form.
Your CSR is now ready, so you need to copy it in full, including the lines:
-----BEGIN CERTIFICATE REQUEST-----
(encrypted text)
-----END CERTIFICATE REQUEST-----
Keep your Private Key safe – you will need it during SSL installation.
Option B: Generate CSR on Linux Server via CLI (No Control Panel)
If you are managing a server without a control panel, you can generate the CSR via the command line.
Follow our detailed guide here: How to Generate a CSR on Linux Server (CLI).
Step 2: Upload Your CSR in the myNetShop Portal
1. Log in to the myNetShop Portal.
2. Click on the menu on the left > Dashboard. On the list of services click on Addons > SSL Certificates.

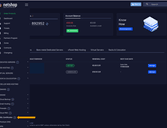
3. Click on Manage SSL Certificates and then Manage.

4. You will see the message: “Your SSL Certificate Request is currently pending.”


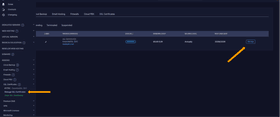
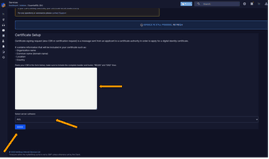
5. Click to Upload your Certificate Signing Request (CSR).
6. Paste the CSR copied from Step 1 into the field.
7. Select your server software from the list and click Submit.

Step 3: Certificate Issuance
Once your CSR is submitted:
- The Certificate Authority (CA) will validate your request.
- The SSL Certificate will be issued shortly after validation.
- You will need to complete a quick Domain Control Validation (DCV) (usually via email, DNS, or file upload).
Upon successful validation of your domain (DCV), you will be able to Download the Certificates via the myNetShop Portal (Addons > SSL Certificates > Manage SSL Certifates)
Step 4: SSL Installation
The last step is to install the newly issued SSL Certificate on your hosting environment.
Option A: Install SSL on cPanel
1. Go to SSL / TLS and then click Generate, view, upload, or delete SSL certificates from the right-hand side menu.


2. Upload your newly Certificate in the large text area, add a description and click Save Certificate.
A message will appear upon successful installation.
3. Go back to the list of SSL Certificates, find the Certificate which you saved and click Install.


4. In the next page, ensure that all text areas are completed (if not, click the Autofill by Certificate button) and then click Install Certificate.
Still Need Help? Get In Touch
NetShop ISP’s Technical Support team works around the clock to assist customers for any technical inquiries.
If you experience any difficulties in generating the CSR or installing the commercial SSL certificate to you hosting environment, submit a ticket to the Technical Support department via the myNetShop Portal.


